
Custom Canes Project
Background
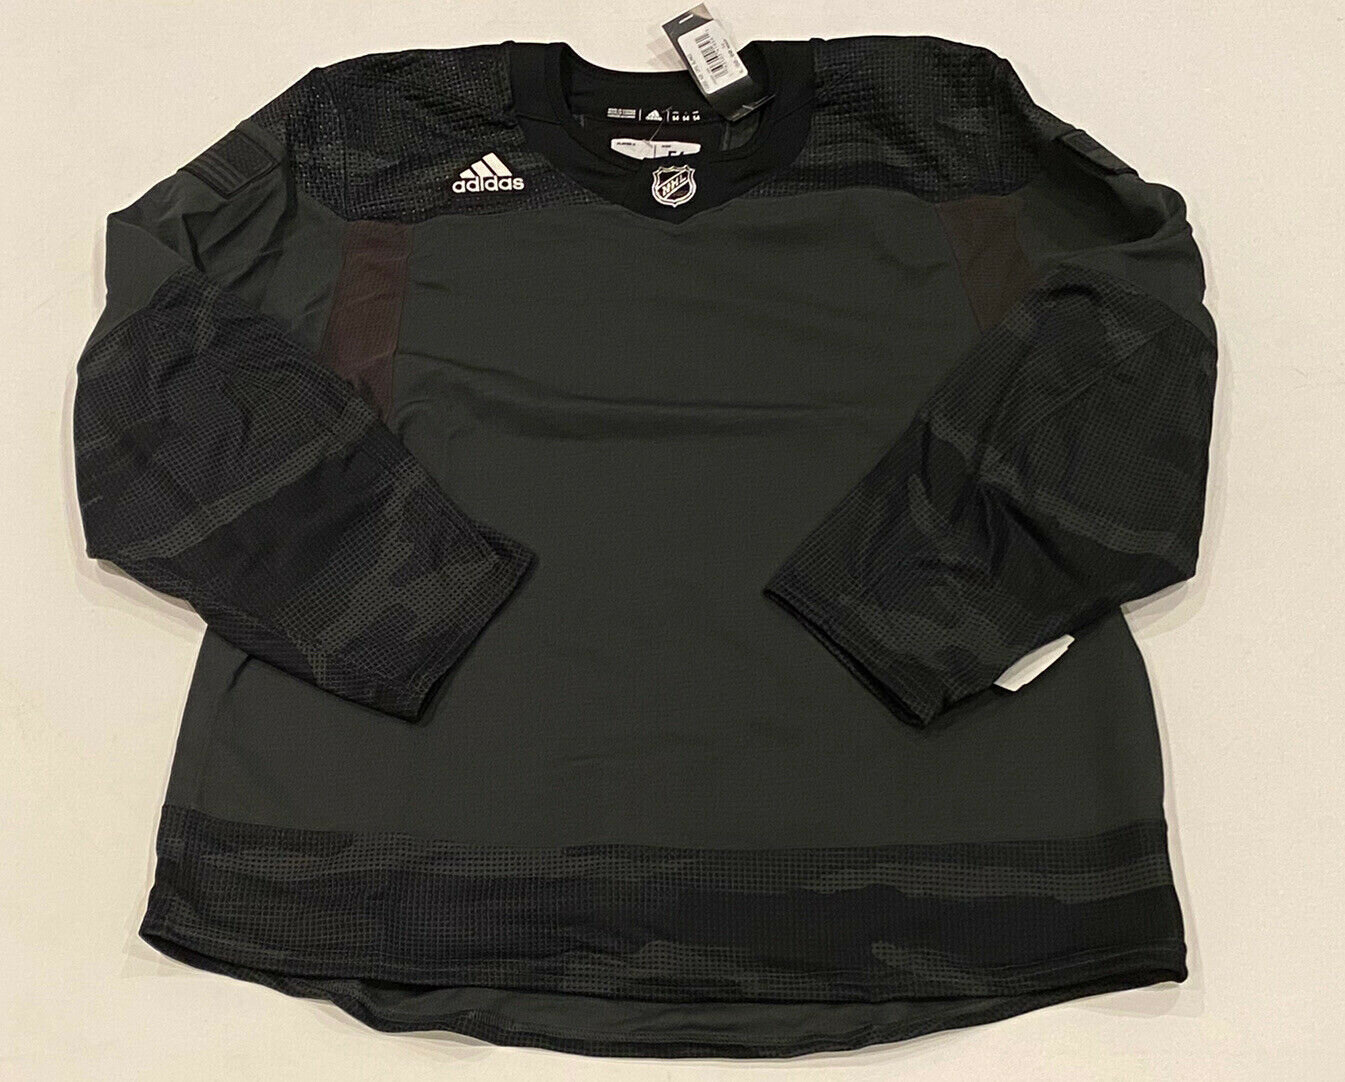

Earlier this year, an influx of overstock Adidas jerseys started popping up at Ross and TJ Maxx. Most of these were common things, like Vegas and Nashville away jerseys, practice jerseys, etc. Occasionally a pro-stock Adidas would show up. One of the more interesting things that would pop up were these unused pro-stock military warm up jerseys.
The question became “what to do with these?”
Therein lies the problem. The normal crests on these jerseys are rubbery and directly applied, meaning there is no patch or crest to replace since they’re a rubbery spray-paint thing.
What makes it even more difficult is that the crests can only be applied by Adidas - no customizer can do them. Adidas and the NHL won’t allow anyone to use this application method on these jerseys.
This begs the question of “what the heck do you do with a blank jersey that you can’t get the normal crest on?”
Inspiration and Design
When looking at these, I saw a completely blank canvas to work with. Over the last year, a user by the handle of CanucksForever67 has been cranking out custom-made practice jersey concepts that really have inspired a new trend of making what you want, and not letting your dreams be dreams. He let me in on his sources for patches and crests, and I began working on concepts.
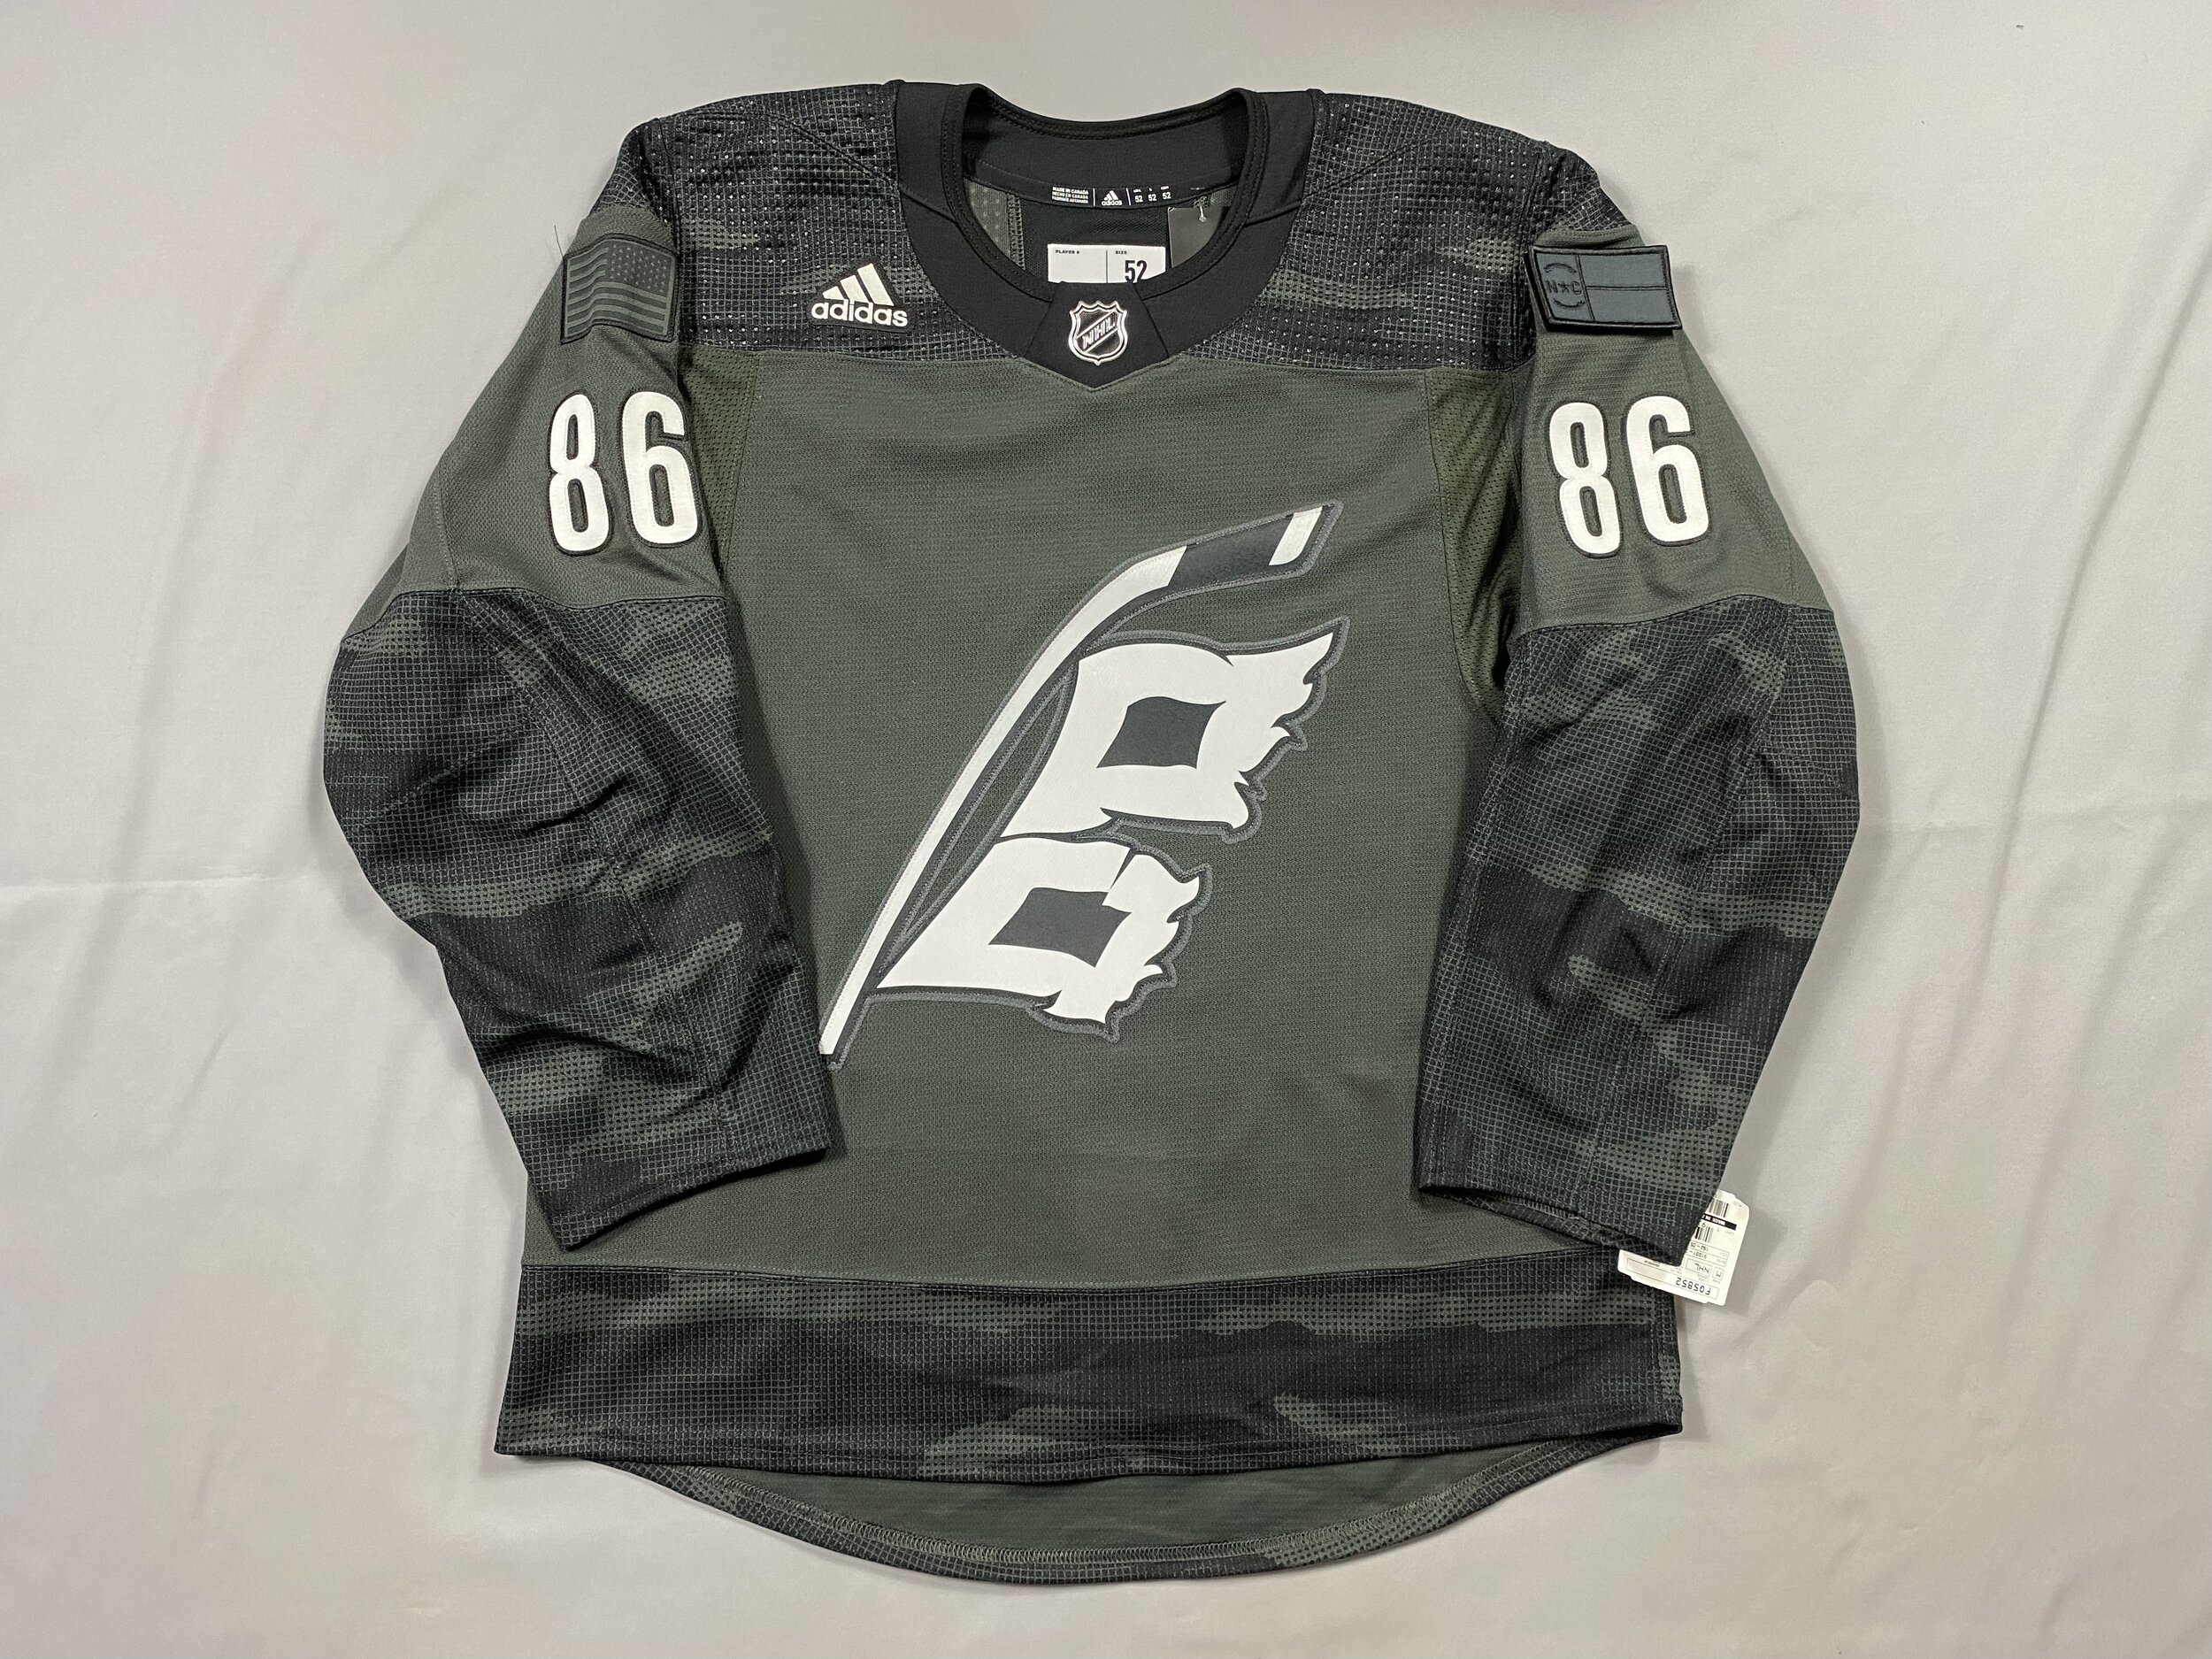
Here’s what I knew: I didn’t like the “weathered” font and crest on the Military Warmups the Canes used in their Military Appreciation Night jerseys. It just didn’t vibe with how clean I felt that it could be, and I decided to pass on that figuring I could maybe do better.
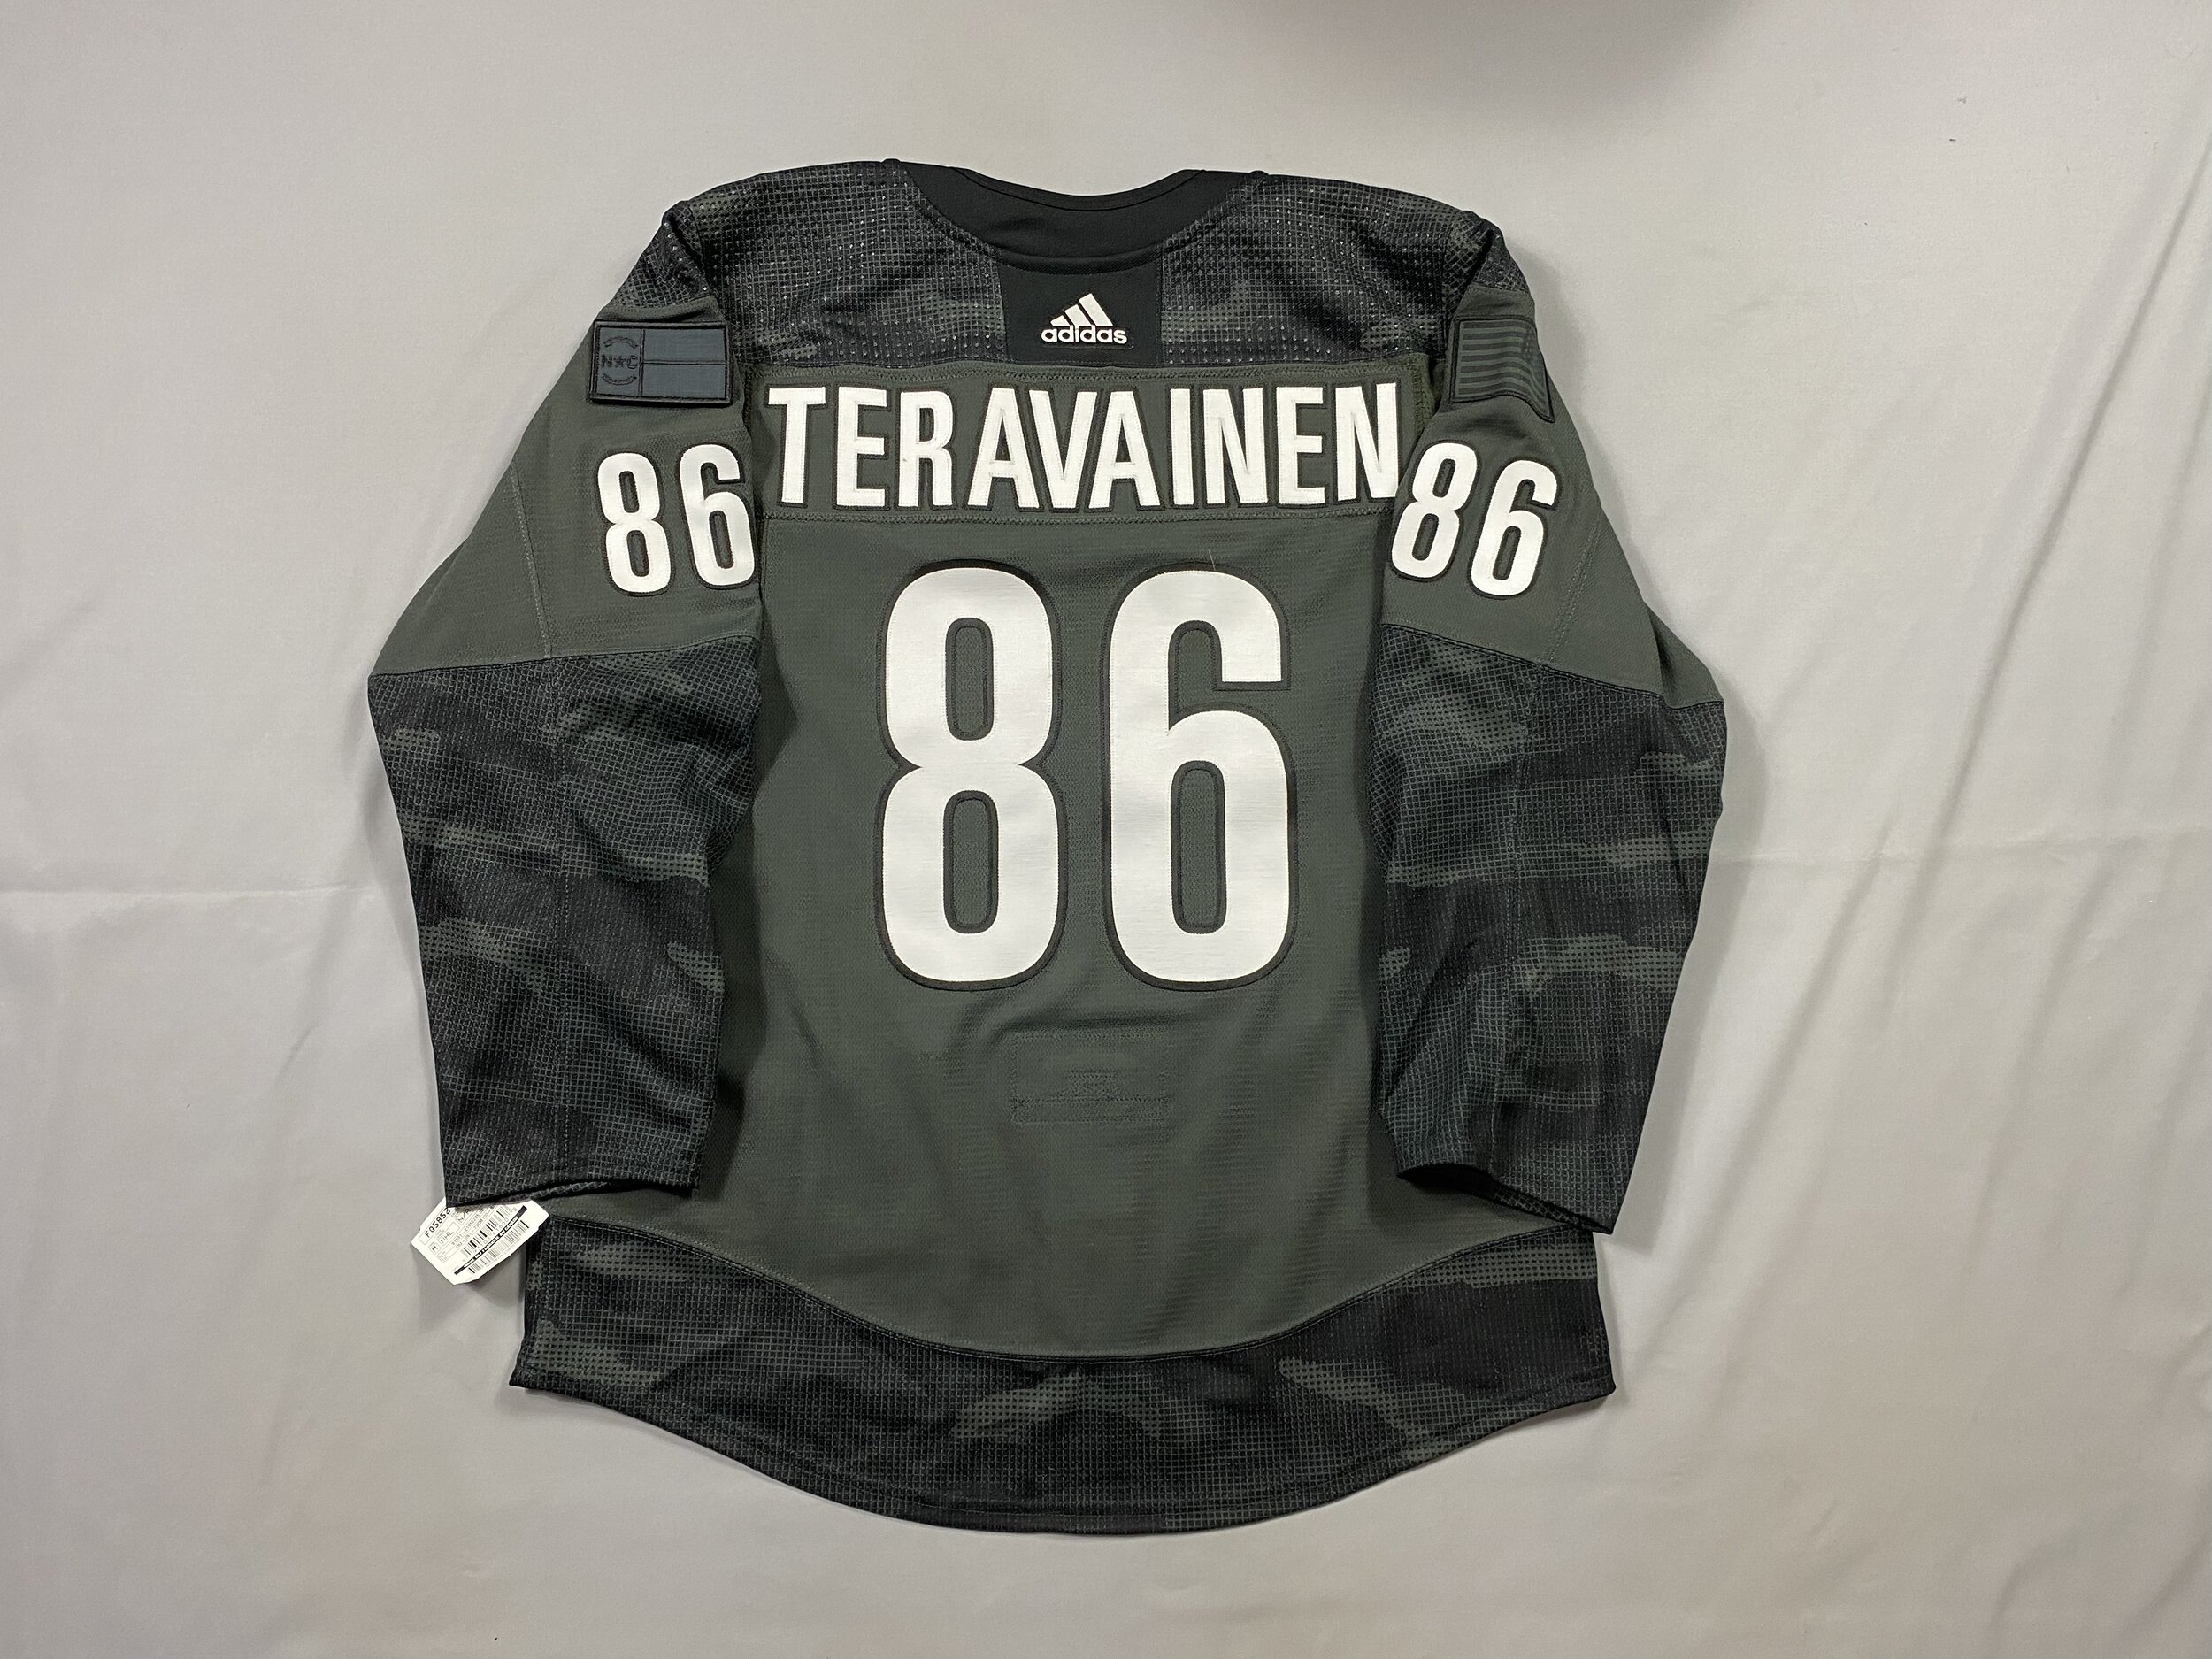
I decided I wanted to use the normal Hurricanes font on the back, and I knew what logo I wanted on the front. The trouble was figuring out what color combination I wanted! Fortunately, the Hurricanes are one of the few teams that publish their brand assets to the public - I could grab the exact fonts, logos, and colors from them to get the most accurate concepts possible.

I knew for the front that I’d like to keep it simple, just black and white. The back could be whatever I wanted. I ended up going with a primarily white version of the alternate crest with black outlines, so I decided to keep the back in the same vein.

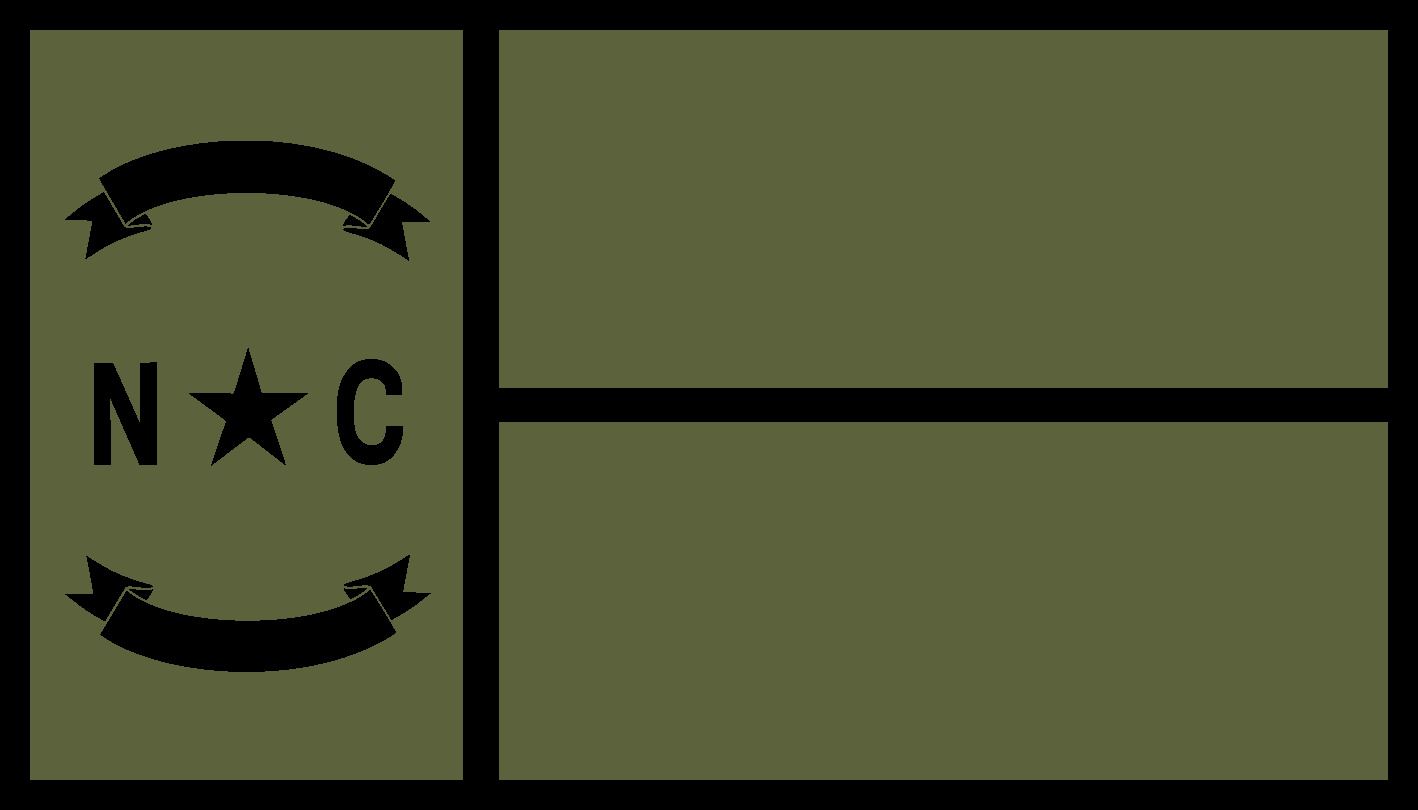
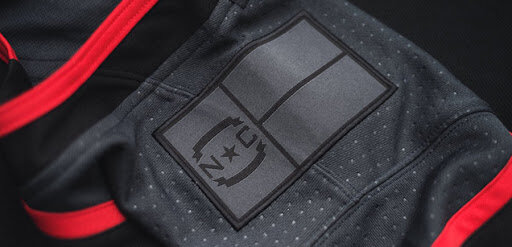
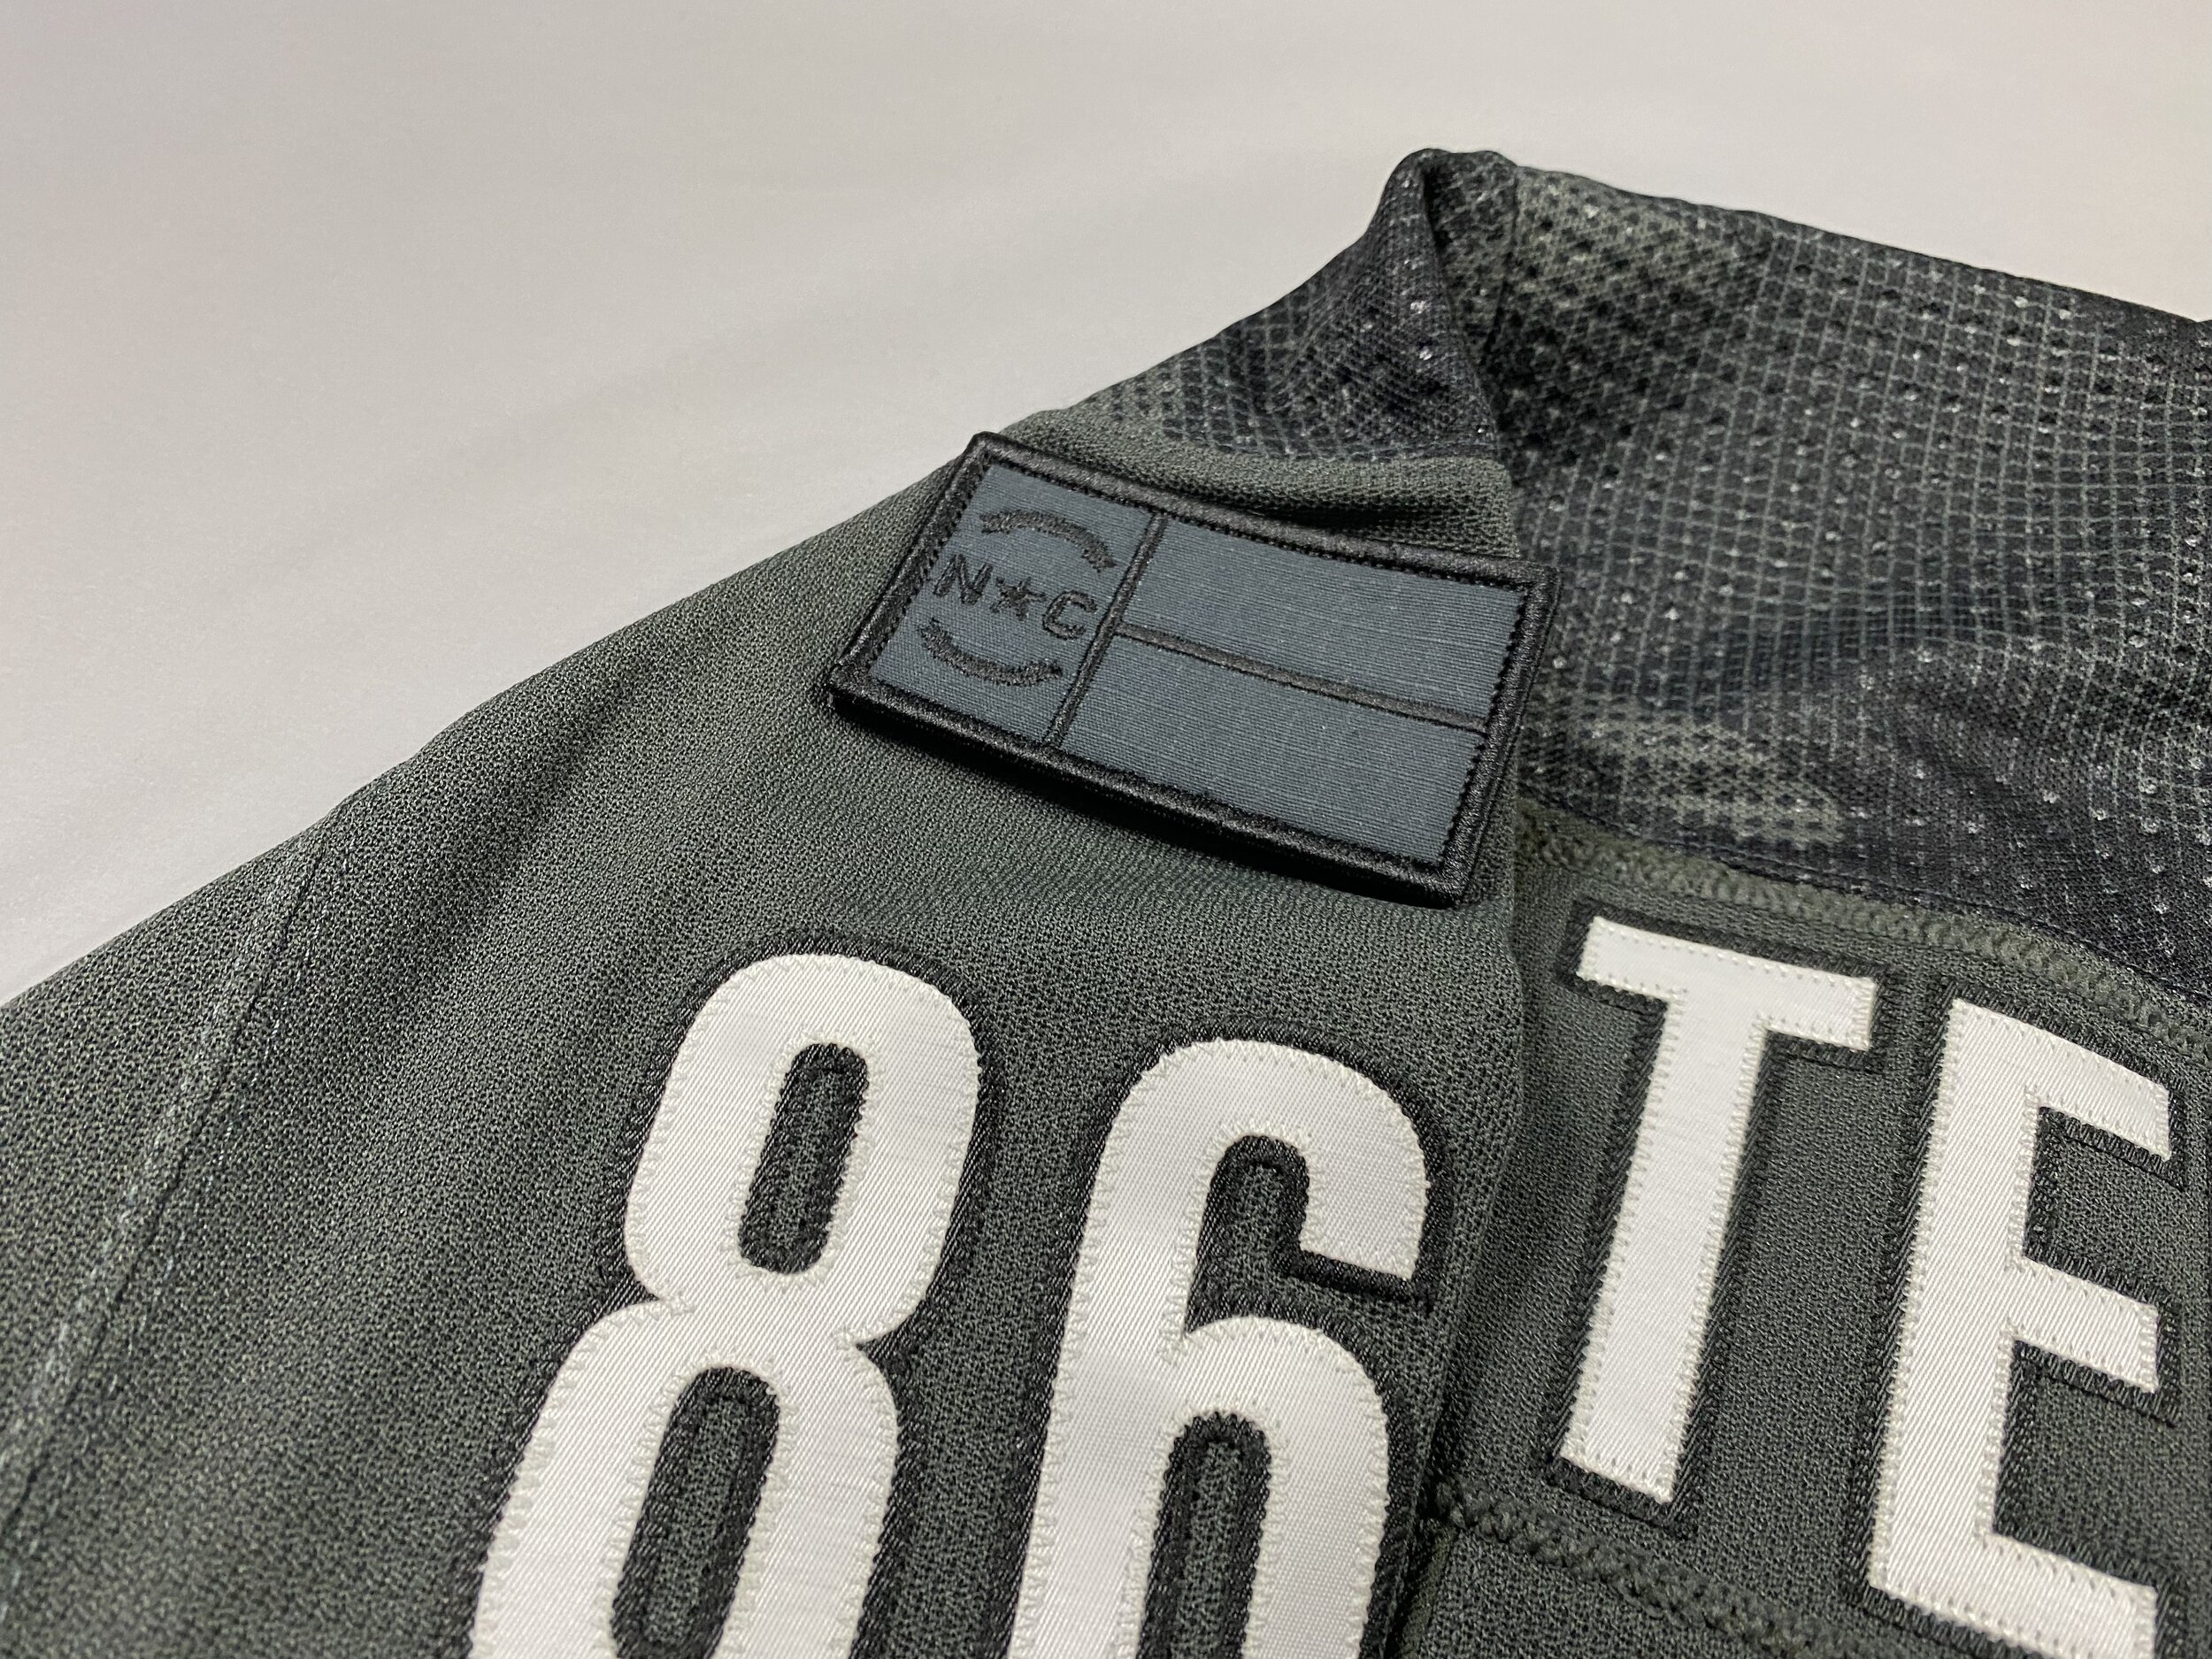
The arm patch was a similar question. I knew I didn’t want to keep the regular “I SALUTE” patch - this was a custom jersey after all! The choice was pretty easy in the end, just go with the NC Flag, similar to how the normal Hurricanes alternates have on their shoulders. The text in the banners on the flag would be too hard to replicate, and would look messy so in keeping with the same idea as their inspiration, I went with solid banners.
Sourcing the Materials
I had to handle four different tasks to get this jersey completed:
Source the crest
Assemble and attach the crest to the jersey
Find a maker for a replacement arm patch
Customization
Task 1: Source the Crest
This would prove to be the most difficult task, as would open a can of worms for what materials and construction could be. After a lot of thought I felt that instead of just the black and white logo, a gray layer underneath would compliment the design, and make the crest sturdier. At first I reached out to Exclusive Pro Sports as I thought they might be able to construct it, given their history making literal unicorns for people. They were unfortunately unable to help with that due to licensing issues, but this isn’t the last we’ve seen EPS.
In speaking with CF67, he pointed me to his embroidery guy. Unfortunately, he couldn’t source the right color twill for the bottom layer, and would have to do black-on-black - which I was not a huge fan of. It would have been a very nice crest, with embroidery instead of flat twill, but the lack of gray was a non-starter for me. I was feeling frustrated at this point - I know exactly what I want, but to get it sourced is rough.

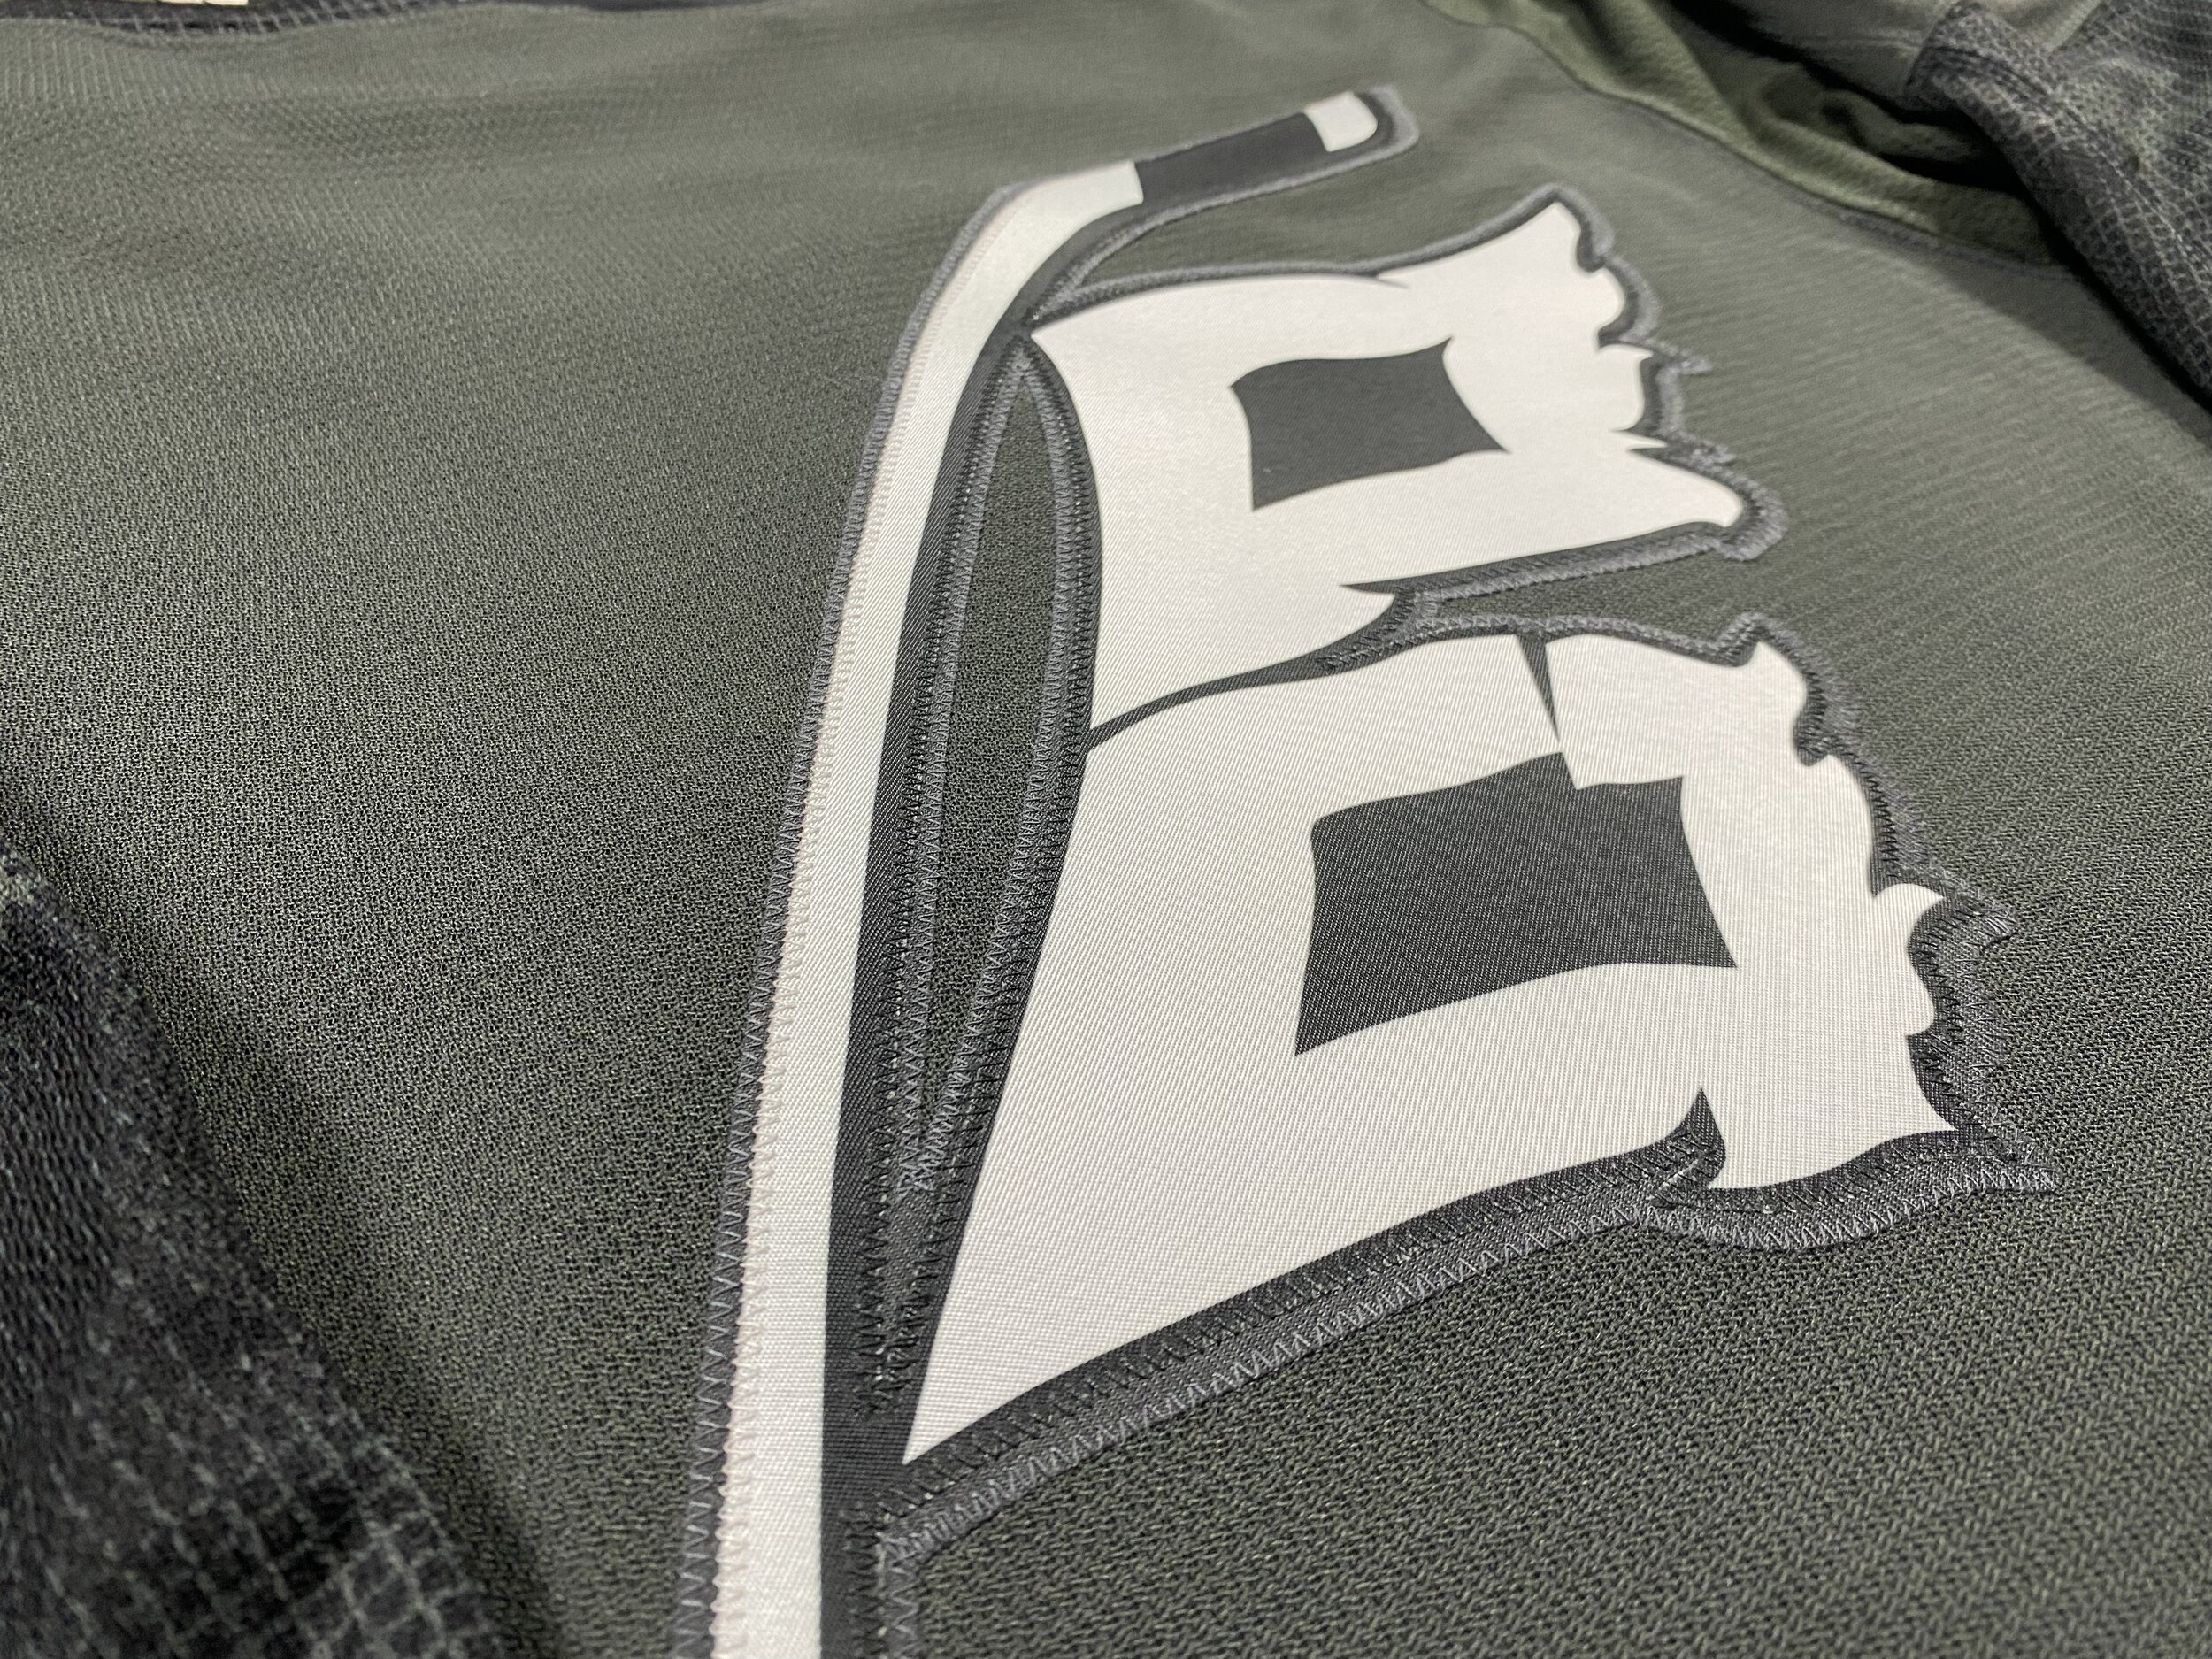
I ended up reaching out to another vendor who specializes in stacked twill and sublimation. There was a problem with this - It would make the crest into a three-layer crest, which is a LOT of stitching. It also makes the crest heavier, which wasn’t a good thing for this. We talked, and ended up using the gray bottom layer like I wanted originally, but instead of three layers he suggested to make a sublimated second layer with the design.
What came out was even better than expected. The black wasn’t as black as separate layers would be, but it would make assembly magnitudes easier. Overall, it created a lightweight and great looking crest that would look awesome on a finished product!
Task 2: Assemble and attach the crest to the jersey
I am not good with a sewing machine. Let’s get that out of the way. I can stitch some random crap, but I don’t trust myself to do anything important. I also don’t have time to learn it right now. I needed to find someone who met the following criteria:
Was based in the US - shipping jerseys cross-border was cost prohibitive.
Knew how to sew
Meticulous with extreme attention to detail
Established in the community
This led me to one single person - PensJerseys. We talked about the project a bit, and he was totally on board with the project. I’d have the crests shipped directly to him, and I’d ship the box of crestless jerseys to him, get them assembled, and sent back to me or wherever. Easy!
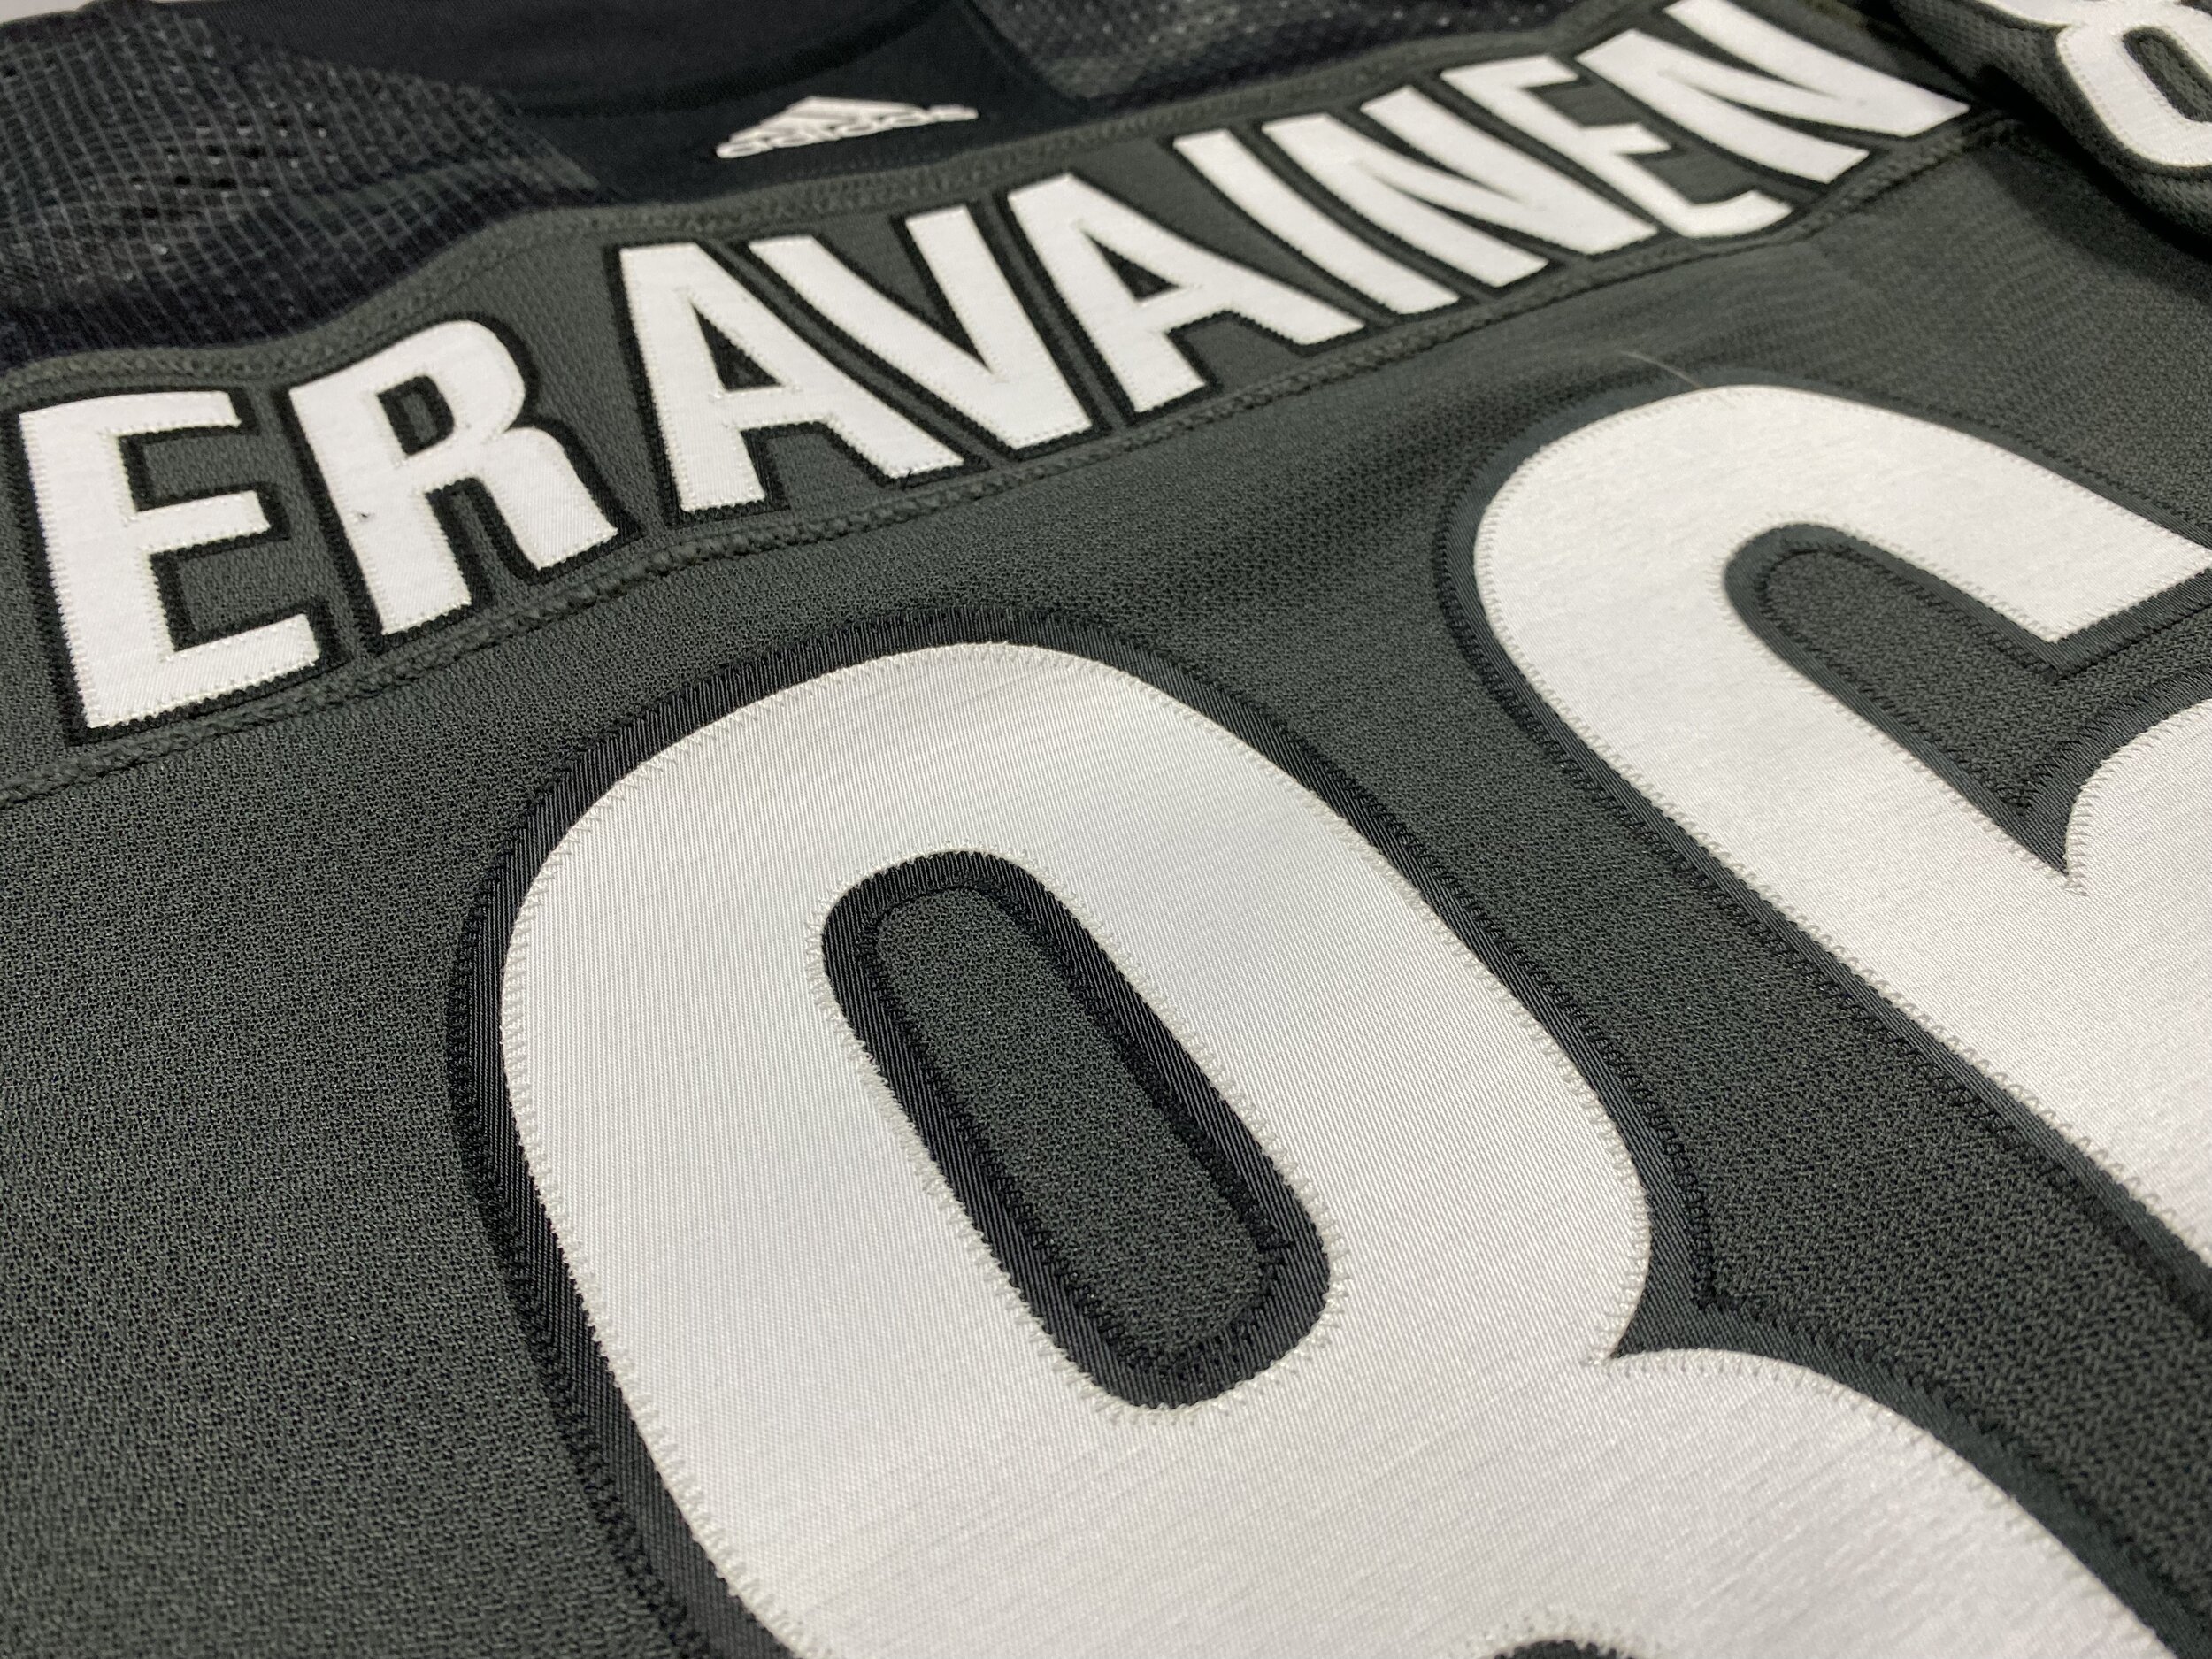
When he received the crests, he made a note that the black wasn’t quite black, and the white wasn’t quite white. He made a trip to the craft shop, and managed to find some thread that was basically perfect. To assemble the crest, he’d have to figure out a good transition plan from the white to black. When I say he was meticulous, I was not kidding. Look at this stitch work, and the color matching!

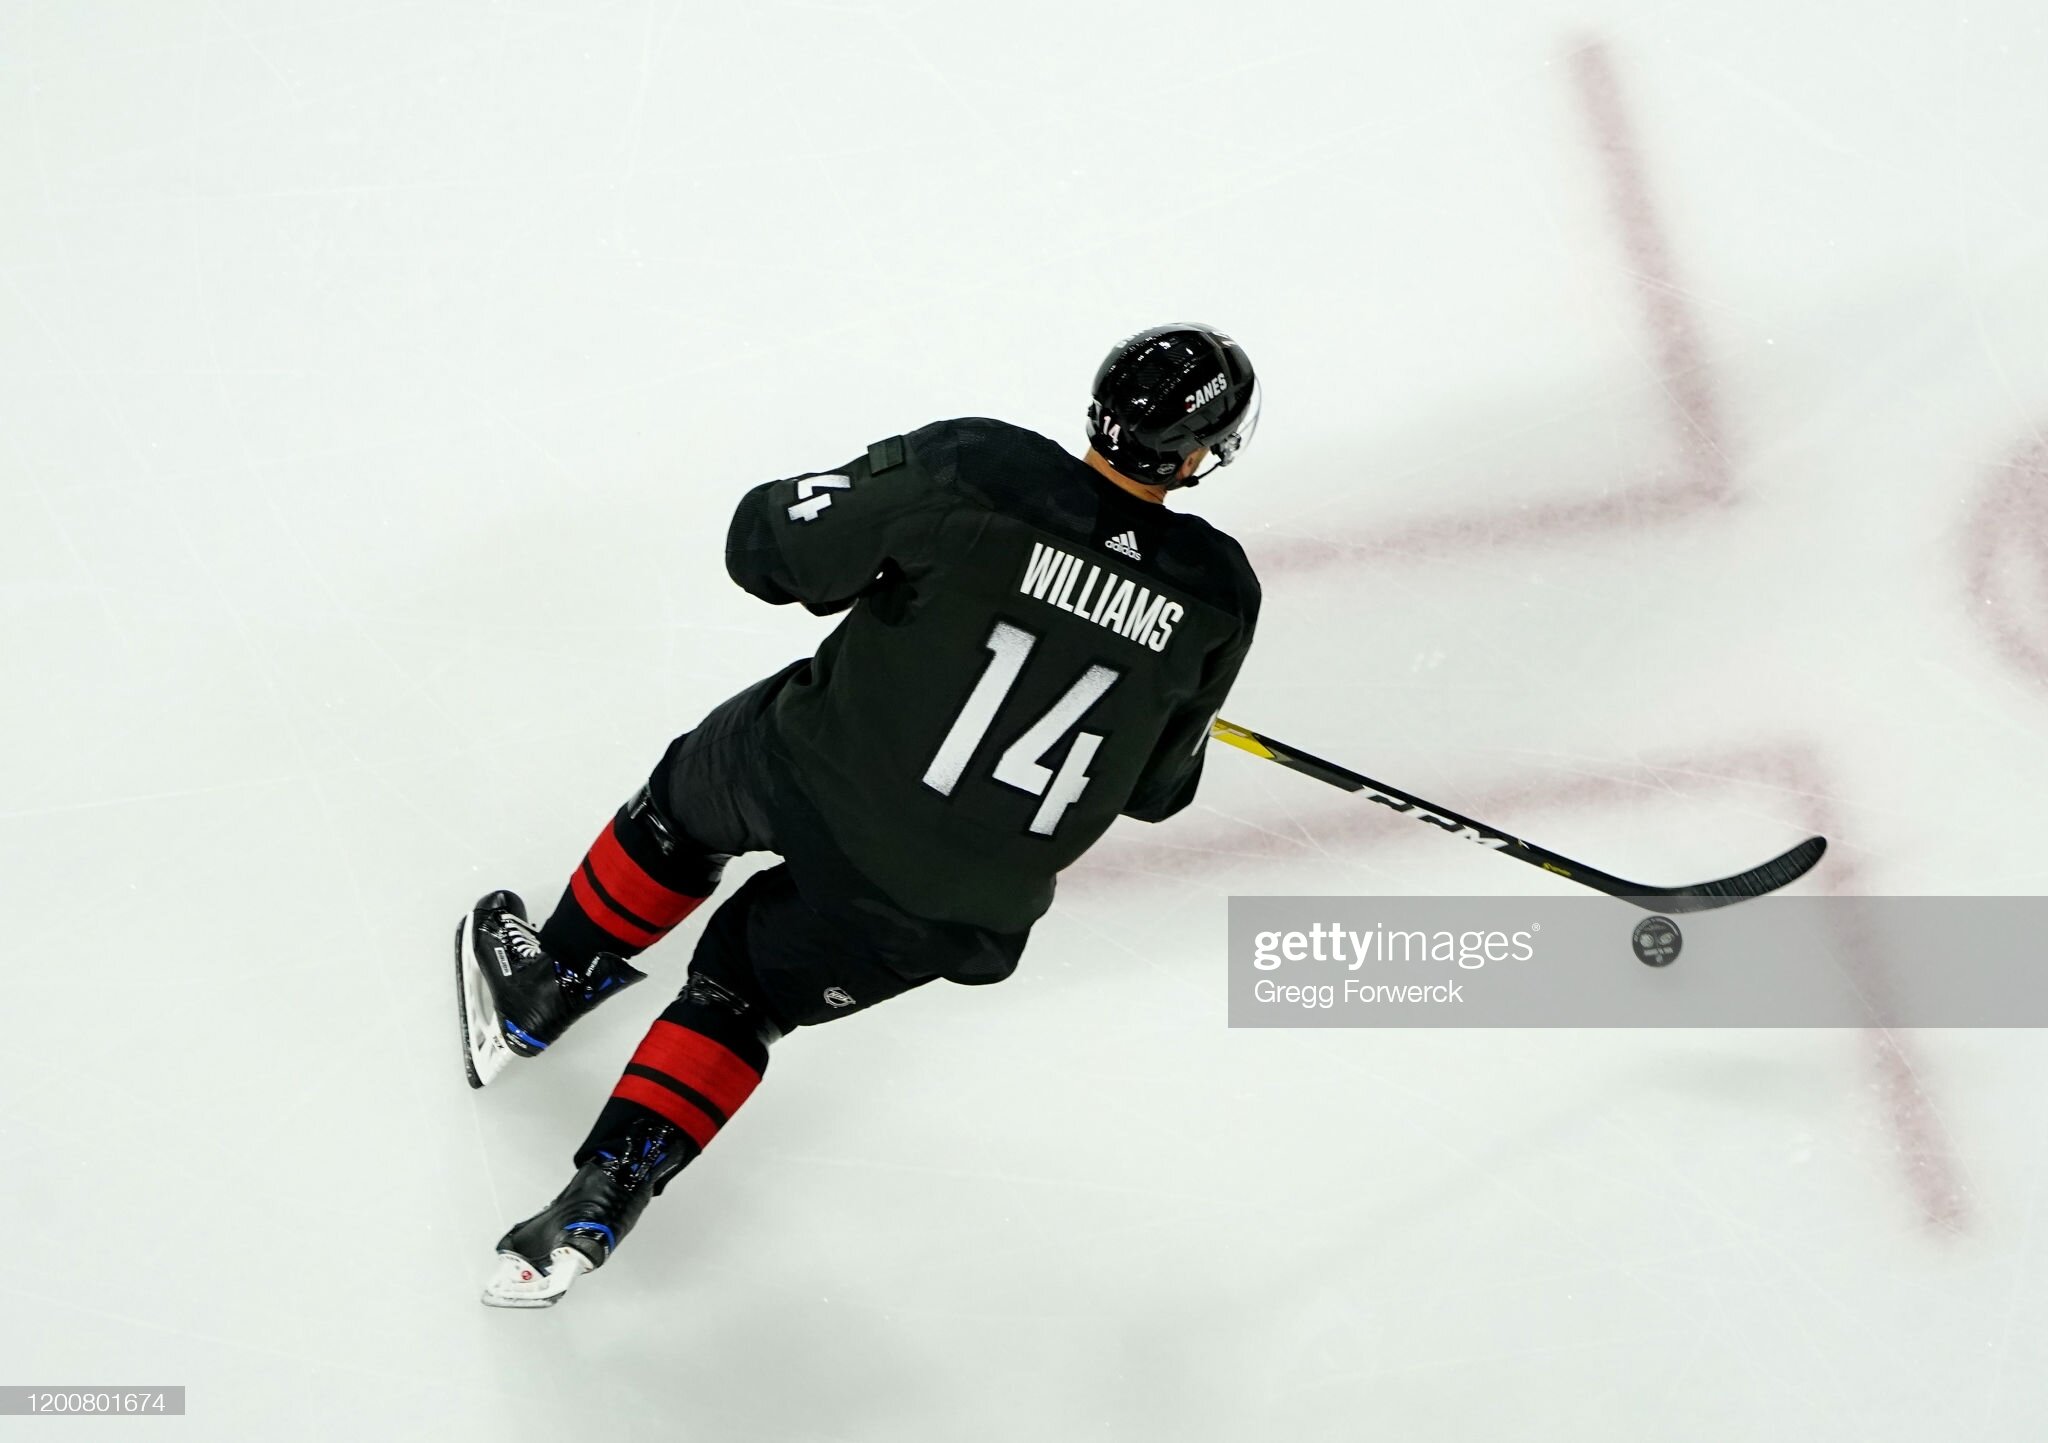
Once assembled, it was time to position the crest. One of my main gripes with the Hurricanes Alternate jersey is how low on the front the crest is positioned. This is exaggerated on the military jersey, and I didn’t think it was a great look. It just felt off-balance, and I felt we could do better. The initial position was measured to be 1:1 with the original jersey, but it was just off.

We ended up scooting the crest up a little higher, and it made the whole jersey feel much more balanced. It feels closer to how it should be, and the jersey doesn’t look like it’s sagging.
Once the position was settled, PensJerseys got to work fully assembling everything. He again found a great color match for the gray twill, and assembled everything, making it into one cohesive look!
It was ready to go have customization done, and get our players of choice put on - one step closer to the final product!

Task 3: Find a maker for a replacement arm patch
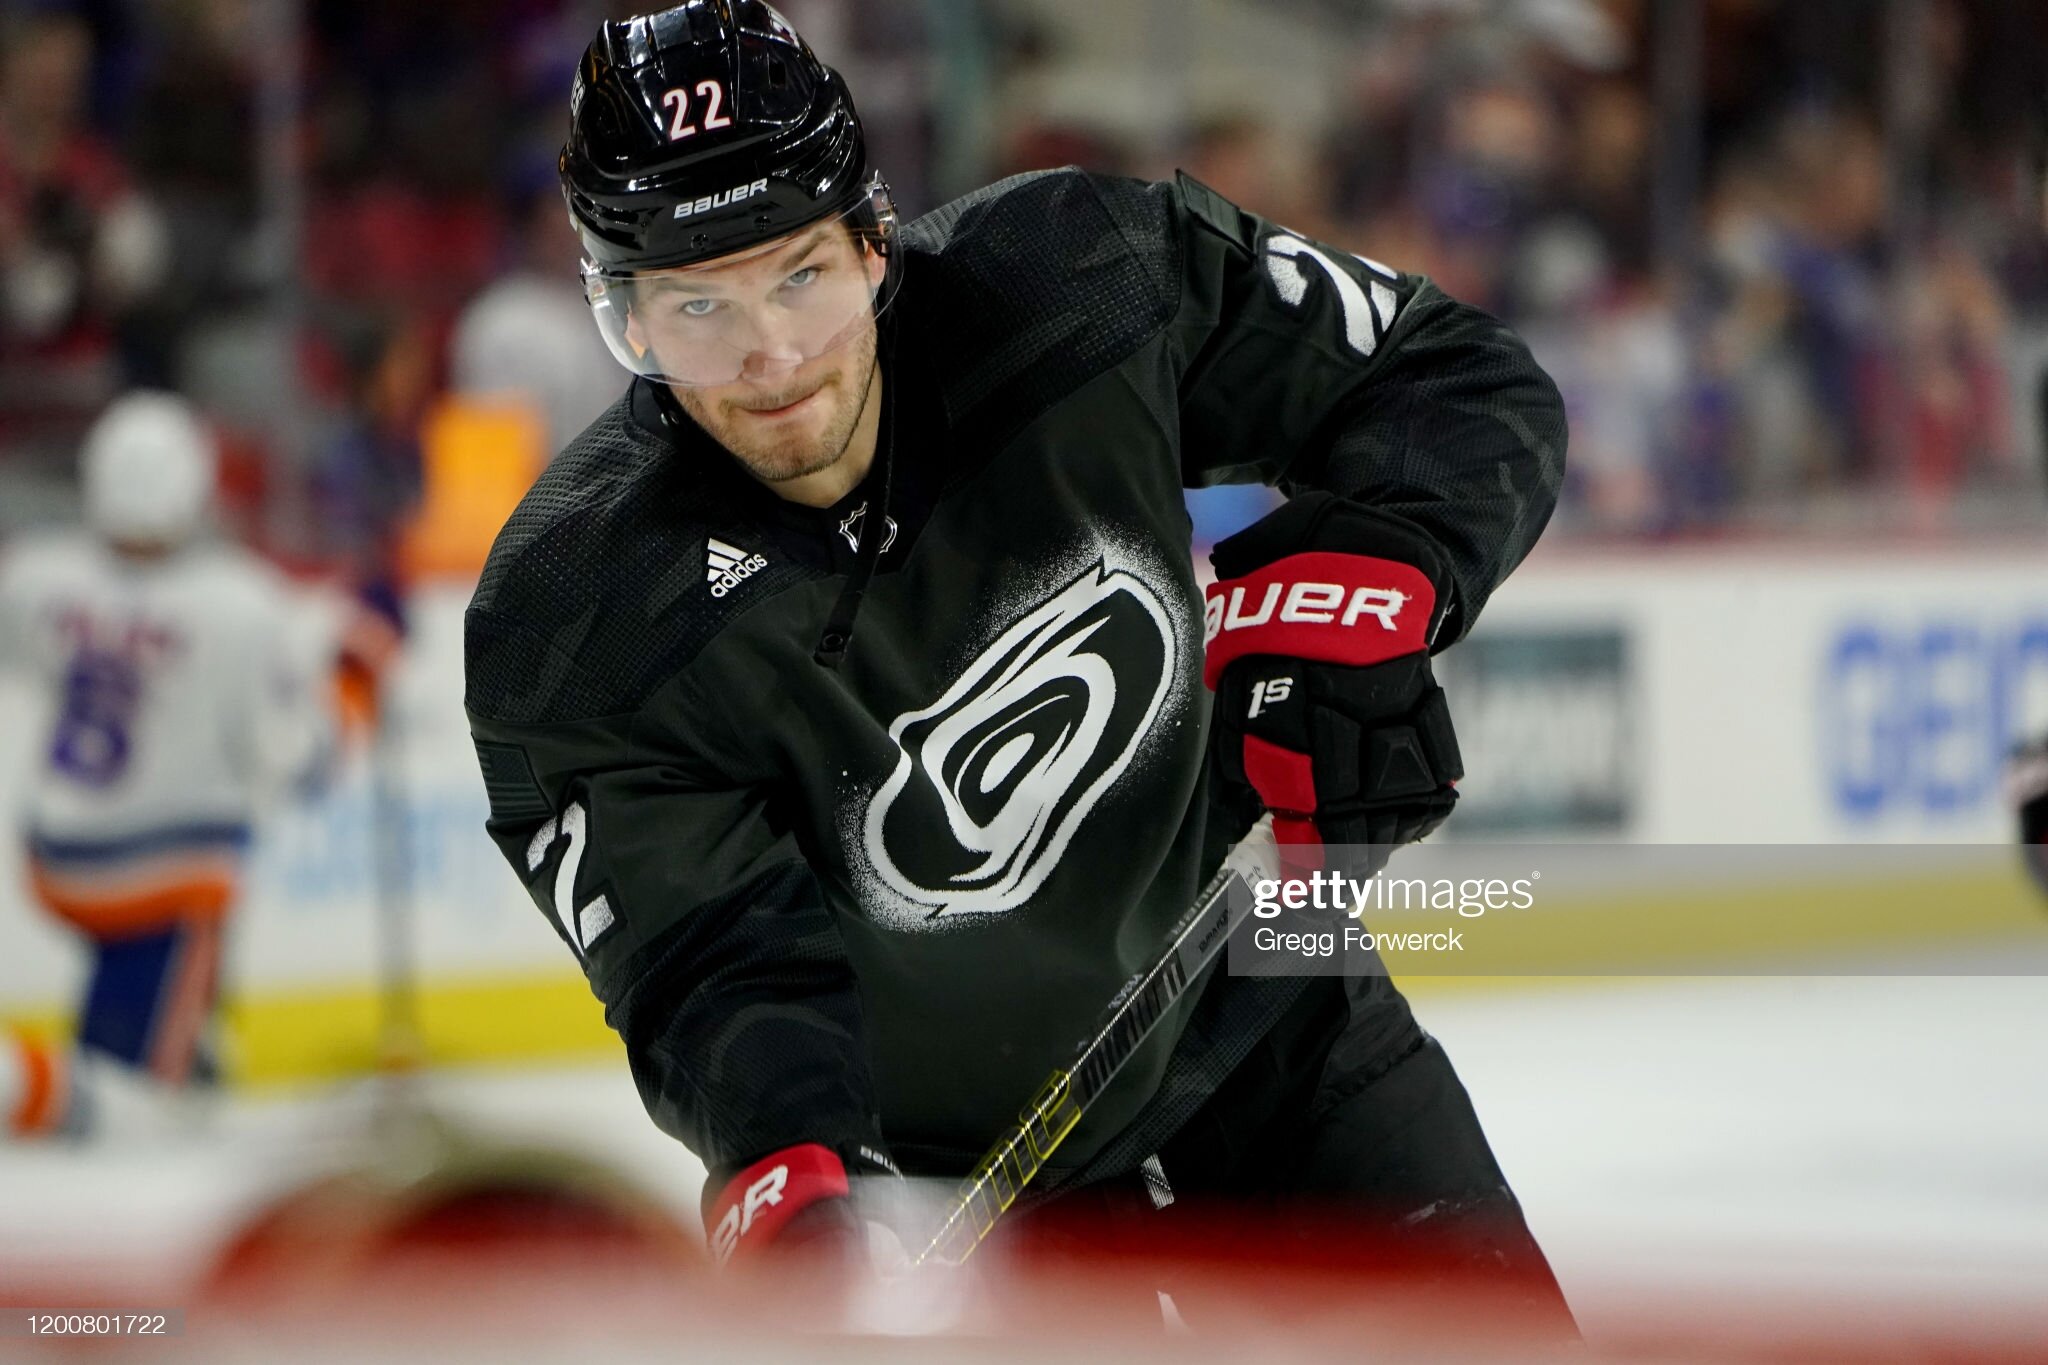
The next factor was finding someone who could make a custom 2”x3.5” patch with a velcro backing that could go into the “I SALUTE” patch’s place. I was put in contact with RiversEmbroidery as they had a custom design product that might work. Originally, I ordered an OD Green patch with black stitching, figuring maybe it would be close. Unfortunately, it was just too bright and garish compared to the Adidas patch.

This was not the end of the world. RiversEmbroidery and I talked some more, and she agreed to send down some swatches of the darkest neutral fabric they had - Charcoal Gray. Well, if that wasn’t serendipity - we were using charcoal gray as the backing on the crest!
After getting the swatches and putting them next to the jersey, it looked like it would be a good fit. I ordered 10 of them in the charcoal gray with black embroidery colorway and I think they came out pretty nice! Different than the stock ones for sure, but still in the same vein. They fit the jersey’s hue much better than the OD Green ones, and were set to make the jersey that much more special.

Task 4: Customization
This was probably the easiest part of the process. Remember how EPS couldn’t help with the crest? That wasn’t all of the message. Since they do the on-ice product for the Hurricanes, they have the proper fonts and tooling to make it great, and they confirmed that they had the matching Adidas materials to have the nameplates match the jersey, making a seamless design. PensJerseys packed up all the assembled jerseys with their included customization choices and sent them along to EPS to be customized.
For those who have never sent anything to EPS - they are the pinnacle of “Good, Cheap, Fast - pick two” - they are excellent and reasonably priced, but they take a long time. Fortunately with the NHL having an abbreviated season, they were able to tend to collector orders a little quicker and it took a little over three months to get our jerseys back, all done up.
Arrival
After months of waiting, I got that delicious email that everyone craves

Paid my dues, and they were on their way home. The next few days of waiting by the door for UPS were agonizing - my project was so close to being done, yet so far away. I tracked the package every step of the way, and even had Follow My Delivery open in a separate window all day so I could watch like a kid waiting for the ice cream truck.
The moment came. UPS dropped off the box, and I dove in - passing all the other things that were done, I dug out the first custom jersey, replaced the shoulder patch, and breathed a sigh of relief - they were perfect. They were everything I wanted and more - even down to the “A” being on the opposite side for those who chose a Martinook jersey.

Detail Shots
Cost Breakdown
Of course with these kinds of projects, people want to know a cost breakdown. I have no problem sharing this. Many of these prices were because I did a set of 10 jerseys, rather than a one-off. Due to this, I was able to obtain some discounts - particularly on the crests!
Adidas Military MiC Warmup: These can be found for around $60-70 on eBay
Patch: $12/each
Crest: $30/each, plus $25/each in labor
Customization: $66
Shipping from RDU -> Pittsburgh -> EPS -> RDU: About $9/jersey
Total (minus jersey): $129/jersey
Conclusion
So in conclusion, what have I learned? What was my takeaway from this experience? Would I do it again?
I loved this project. I felt like I could finally put a design in my head onto fabric, and have it work. These came out so clean and so good looking; they’ll for sure be conversation pieces for ages.
Talking with so many people about this project was a tricky thing too. The logistics were certainly interesting, but we made it happen! Everyone I talked with was awesome, and I’m so glad I was able to get this done.
I’d 100% do this again. I just have to find the right concept, and have enough interest. The Military Warmup jerseys were such a great and unique canvas that it gave me a special chance to give something new a shot.
Thanks
PensJerseys - for doing such an amazing job on the crests
RiversEmbroidery - for working with me to get the patches right
Lynette at Exclusive Pro Sports - for understanding what I wanted to do, and having the team absolutely nail it.
CanucksForever67 - for being an absolute inspiration and innovator in the community